O in the Oaks '09
Pacheco State Park
Date: Nov. 7 - 8, 2009
Location: Hollister, CA
Event Director: - 408.313.3753
Course Setters: Dan Greene, Derek Maclean, Toby Ferguson, Alex Finch
Type: A; 2-day A-Meet on a New Map! 60 mi south of San Jose
Course Setters' Notes
[These notes are also available in a PDF file (321KB).]
Introduction
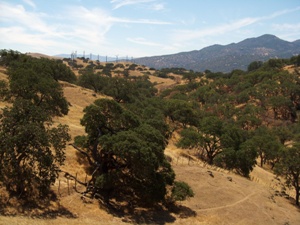
Welcome to Pacheco State Park, BAOC's brand new map just south of the Bay Area. All the courses will be printed at 1:10000 with 5-m contours. The area is hilly, and courses will have climbs typical of the Bay Area — but test runs suggest that it is fast, and likely will produce some of the fastest (climb adjusted) minutes-per-kilometer times of any Bay Area venue. The terrain is a mixture of lightly wooded and open, with pockets of rock detail, almost no fight or poison oak, and filled-in reentrant bottoms that provide running corridors and add interesting new options to route choices not typical of Bay Area terrain. Photographs of the terrain can be found here (http://tinyurl.com/yjd6ojz) (the password is "guest").
Because of the fast terrain, we've lengthened the courses to meet standard winning times. While we expect the terrain to favor the faster and fit orienteers, we have designed route choices and included pockets of complexity that should reward orienteers that can shift gears quickly and apply the appropriate thought and care to each leg of the course. We expect courses to favor fit orienteers that are also good navigators.
Both Day 1 and Day 2 are Long (Classic) courses. Results will be combined to determine awards. There will also be a short map walk to a spectator location on Saturday, and a free Trail-O training course available on Sunday. Details on all the courses follow the map tips below.
The terrain immediately around the registration area is unusually open and not very representative of the terrain further in the park. The next few sections should provide some advance advice on what to expect.
Reentrants
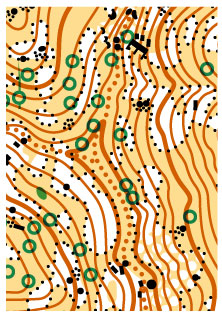
As mentioned already, the reentrant bottoms are open and very passable. Figure 1 (at the end of these notes), shows a sample of a reentrant bottom that is on a route choice for several courses. (It's only a choice, no guarantee you'll actually take this route!) Because the area is high and dry, there is not the usual run-off that creates the steeply notched reentrants that are more common on Bay Area maps. You'll find these reentrants easy to cross and easy to use as hand-rails and running corridors.
This creates another significant route choice on some of the legs on the courses. Whereas in many Bay Areas venues you might worry about finding good reentrant crossings (and you certainly wouldn't think of running in a reentrant bottom), at Pacheco these reentrants will add an additional dimension to the route choices, for example, you could contour a hillside, climb to a ridge line, or drop to a reentrant bottom.
Because of the novelty of the reentrants at Pacheco, and their potential impact on route choice, we should say a few more words. All the intermediate and advanced courses on Day 1 will visit a reentrant on their very first leg, so you should get an early indication of these reentrants before you have to make longer route-choice decisions later in your course. In many locations, the very bottom of the reentrant has leveled out with a mixture of dirt and small boulders, and the deer and elk have added trails, either directly in the bottom or on the nearby sides of the reentrants. However, for route-choice purposes you should not consider reentrant bottoms to be as fast as running in an open field; there are enough small rocks that you will have to watch your footing and run at slightly less than full speed (e.g., 80% – 90%). Where there is rock complexity shown near the reentrant bottom (e.g., at the north or south end of the reentrant in Figure 1), this also translates to additional rock material in the bottom of the reentrant. It is still very passable, but you will need to slow further (e.g., 50% – 80%), or use the nearby hillsides to bypass these areas.
Mapping of Lone Trees
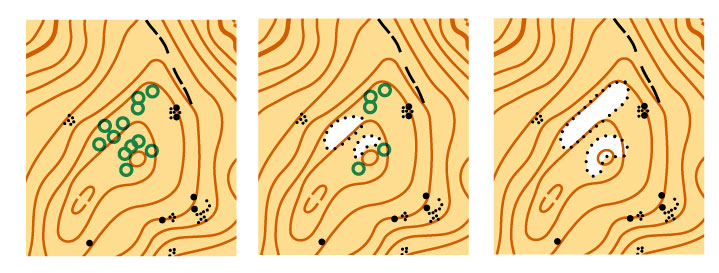
A distinct lone tree is mapped as a green circle. This mapping is based on the tree standing out when viewed in the terrain. It is not necessarily based on a tree's physical size — small trees can also be mapped as lone trees — but mostly based on its distance to neighboring trees. When the trees are too close together, the mapper has shifted to using white area symbols with a distinct boundary (small black dots) on the borders of these white areas. The middle frame of Figure 2 (at the end of these notes) illustrates the typical mapping convention for Pacheco State Park.
In areas like Pacheco, with predominantly large oak trees, this can create some ambiguity in how the oaks are mapped. Figure 2 shows three possible ways of mapping the same hilltop. An orienteer approaching the hilltop will not necessarily be able to see a one-to-one correspondence between trees in the field and trees on the map (shown on the left frame of Figure 2). Far more likely, the orienteer will find the situation in the middle frame, where only some of the trees seen in the terrain will be shown individually on the map. On almost all the courses at Pacheco, care must be taken when matching the larger oak trees with the map.
Also note that the small black dots on the boundary of the white areas helps improve the readability of the map, where white can otherwise blend easily with yellow. However, in areas of rocky ground the black dots can become confusing. Regular spacing indicates a vegetation boundary.
Mapping of Brush
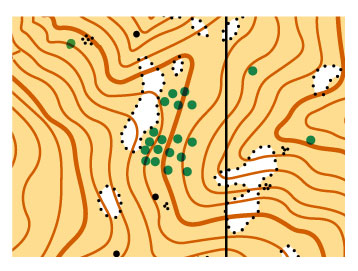
The Pacheco map contains very little fight. In areas where there are scattered bushes, the mapper has used scattered green dots. These bushes do not significantly affect runnability, otherwise the mapper would use fight (green area) or undergrowth (green lines). In areas of multiple dots (see the center of Figure 3 at the end of these notes), these green dots should be treated in a manner similar to rocky-ground black dots — they are not meant to map individual bushes, instead their density on the map corresponds roughly to their density in the terrain. Unless they are isolated green dots, the orienteer should not try to match green dots with individual features in the field.
Boulders
In the more complex areas, the mapper has applied a 1-meter threshold to determine which boulders and cliffs are mapped. Elsewhere, isolated boulders might be mapped at a lower threshold (e.g., as low as 0.5 m). Be warned that on the hillsides, from above or below, it may be hard to judge boulder height. While the open woods will give you lots of visual information for navigation, making it possible to successfully use rock detail for navigation, if you ever disconnect from the map the mapping threshold can make it difficult to reconnect based on identifying rock features.
Proximity of Controls
We have followed IOF standards: no controls are closer than 30 meters, and controls on similar features are at least 60 meters apart. This is closer than USOF standards, so please be careful to check your control codes.
Wildlife
Keep your eyes open and you may get to see a variety of wildlife. While course setting we have seen a bobcat (size of a small dog — he was hunting a ground squirrel), a boar (woke him up on a hilltop — he turned and ran), two rattlesnakes (see the Safety section), coyotes (they will slink away as soon as they see or hear you), deer, hawks, ground squirrels, song birds, frogs, and a herd of elk (six of these guys running on a hillside makes a lot of noise). As of this writing there are no cows in the park, but there is the possibility ranchers could move some in (see the notes on electric fences for the Day-2 Red and Blue courses!).
Start Sequence
The start sequence will be the same both days. If you are scheduled to start at time T, then the sequence will be:
- Clear and check your e-stick when you arrive at the Start area.
- T – 4 minutes (Call Up): Report to the call-up line.
- T – 2 minutes (Move to Start): You'll move a short distance ahead to the maps and the Start triangle. Write your name and bib number on the back of your map — leave the map in the bin. You may ask a meet worker to verify that the map is for the correct course, but do not look at the map, and then place it back in the bin.
- T (Start): Punch the Start control, and then pick up your map.
Safety
Rattlesnakes
We spotted rattlesnakes twice during course setting. One shook its rattle after we had passed by it and were walking away. The other was asleep. They will not attack easily, and you are likely to hear a warning before they strike. In the rare case you are bitten, avoid any additional exercise (to slow the spread of venom), and use your safety whistle to summon other orienteers to help you.
Ticks and Lyme Disease
We have not seen ticks while course setting, but some of the ticks in this area carry Lyme disease. Check after you orienteer, and if you find a tick, remove it quickly. Lyme disease can manifest with diverse, inconclusive, and easily confused symptoms, so if you do have tick bites, alert your doctor to your possible exposure to Lyme disease.
Mountain Lions
These are rarely ever seen, but they are active in the hills around the Bay Area. If you do see a mountain lion, do not run from the mountain lion or you risk triggering its pursuit response. Instead make yourself appear as large as possible, and back slowly away.
Poison Oak
There are only a few bushes of poison oak that we have come across in the park. It is easily avoidable.
Loose Rocks — Watch Your Ankles
There are areas of loose rock in the park, and they are sometimes hiding under the tall grasses. This can be true on hillsides as well as reentrant bottoms. Pay attention. Turning an ankle is not good for your time.
Contouring can also cause blisters, although the softening of the ground after some early season rain has helped matters.
Grass Seeds and Stickers
The park is full of dry grasses with lots of adherent seeds and stickers. Their aggressiveness seems to be lessening as the weather gets cooler and damper. Gaiters and/or tape on exposed socks may be useful to stop them working their way into annoying spots.
Hydration
While we have put sufficient water on the courses, it is always a good idea to arrive at the Start well hydrated, especially if the weather is hot. This area is dry and exposed in many sections.
Whistles
Every entrant must carry a whistle in case of an emergency. If you do not have one, they are available free at registration.
Please note that whistles are not toys. They should be blown only to signal an emergency.
The emergency signal is three short blasts, repeated every minute.
Orienteers hearing an emergency call are required to respond.
Day-1 Long Courses (Saturday)
Course Setters:
- Dan Greene – Orange, Brown, Green
- Alex Finch – Red, Blue
- Dan and Alex – White, Yellow
Time Limit: 3 Hours
Safety Bearing: North until you hit a road — follow to parking lot at the north end of the park.
Special Request: The White and Yellow competitors on Day 1 will traverse the registration area about half way through their courses. Please keep the flagged route clear for these competitors, and cheer them on! And, as you return from the Finish, please give right of way to any White and Yellow orienteers that might be using the same trail.
Start and Finish
The Day-1 Start for all courses is visible from the registration area; follow the trail SSW for 750 meters to the Start, which is in the shallow saddle on the south horizon. Allow 15 minutes to walk to the Start. There will be clothing return from the Start to the registration area.
On Day 1, the maps and Start triangle will be very close to the Start line. The best (and only plausible route) for all courses will be to proceed a short distance ahead on the road and through a gate in the road — after which starters will no longer be visible and their more interesting navigation begins.
The Day-1 Finish is 800 meters W of registration, through the low saddle to the W and out of sight. (Ignore the "Park Boundary, Area Closed" signage on the gate in the low saddle. We have permission to use this area.) When you return from the Finish, please give right of way to any White and Yellow orienteers that might be using the same trail.
Spectator Location
The Day-1 courses are spectator friendly. If you are not competing (or have already completed your course), you may visit the spectator area. To see the intermediate (Orange) and advanced (Brown through Blue) courses, proceed to the Start (750 meters) and obtain instructions to proceed an additional 250 meters (uphill) to the nearby spectator perch (just on the far side of the high point visible east of the Start, SW of the registration area). The spectator perch has a spectacular view of the Reservoir and the Central Valley. From the spectator perch you'll be able to see orienteers on their first few legs, and then later approximately 10 minutes before they finish. It's also possible to walk directly from the spectator perch to the Finish by following the ridge line 850 meters north. This will be shown on the spectator map provided at the Start. For those not used to navigating, the trip up to the spectator perch (and then down the ridge line to the Finish) will be off-trail, but should be easy to follow because most of the route will be on the high-point of the ridge line within sight of the registration area.
White and Yellow Courses
The White and Yellow courses cut across the registration area. Because of the possibility of confusion, you'll have one control at the beginning of this area and a flagged route through the area to another control on the far side of this area.
Orange Course
To conform to USOF winning time standards, the Orange course is significantly longer than a typical Orange course in the Bay Area. (This is due to the different objectives for Orange courses at A and B meets.) If you are stepping down from advanced courses, you will find Orange physically demanding (for this reason Brown would be a better choice). If you are stepping up to Orange, you may find it best to shorten the course at one of several obvious shortcuts (e.g., 7 to 10).
Orange-course orienteers should also read the information below on windmills and out-of-bounds areas.
Advanced Courses (Brown to Blue)
Day-1 courses are adjacent to a large area of windmills. These windmills are large, and are further away than perceived (e.g., those apparent bushes under the windmills are full-sized oak trees). Only a very few windmills are on the map. Because of their scale and absence from the map we do not recommend using them as navigational aids. While you will enjoy seeing them at a distance, no good route choices will take you to the windmills. Please do not approach within 100 meters of a windmill.
Out of Bounds
The park has been aggressive in placing "park boundary" and "area closed" signs on the edge of trails that are on the east side of the map near the windmills. These signs are intended for trail hikers to prevent them from leaving the marked trails in the direction of the windmills. We have discussed this with the rangers, and it is okay for you to use terrain east of these signs provided you stay on our map, and avoid approaching closer than 100 meters to the few windmills on the map. There is a road along the east edge of the map that should prevent you from leaving the map. None of the good route choices will take you near the area of the windmills, which is out-of-bounds.
Natural Springs — Frog Habitat
In a few reentrant bottoms, there are natural springs that are habitats for frogs. Assuming it is not raining, please follow this rule: Stay on dry hard ground. That is, avoid running through puddles and muddy patches that could be a frog habitat.
Day-1 Course Statistics
Course Distance Climb
  White      2.4 km     55 m
  Yellow     2.7 km     95 m
  Orange     5.0 km    290 m
  Brown      3.5 km    185 m
  Green      5.0 km    315 m
  Red        6.7 km    485 m
  Blue       9.5 km    615 m
Day-2 Long Courses (Sunday)
Course Setters:
- Derek Maclean – Brown, Green, Red, Blue
- Toby Ferguson – White, Yellow, Orange
Time Limit: 3 Hours
Safety Bearing: North until you hit a road — follow to parking lot at the north end of the park.
Start and Finish
There is a single Start and Finish for all courses on Day 2. It is 1.2 km from registration with 80 m climb. Please allow 25 minutes to get to the Start. There will also be a 1.3-km walk back from the Finish.
White & Yellow Courses
While every effort has been made to keep the climb as low as possible, but this is still California — be prepared for a climb immediately upon starting, and continuing for about 1/3 of the overall course length. The effort is amply rewarded by spectacular vistas across this beautiful park, as well as the fact that once you do get to the top "it's all downhill from here"!
Because of the open terrain, this is a great opportunity for the Yellow runners to get features much further off the line than usual. I've taken the opportunity, right from the first bag, to give the Yellow runners incentive to think about leaving the safety of the trail and heading to the clearly visible bags off in the meadow without simply running "there and back". In addition, it will pay handsomely for Yellow runners to see where they might "cut off the corners", saving both climb and distance over the non-optimal, trail-based route. The course statistics might make it look easy, but you'll have to work hard to avoid a much longer course (whose statistics haven't been printed here!)
Orange Course
The Orange course has a nice mix of technical and physical characteristics. I've paid close attention to giving Orange runners distinct catching features so that the penalty for missing the control isn't too extreme.
The routes between controls 7, 8, and 9 allow for a (non-optimal) choice of crossing a barbed-wire fence and selecting a parallel trail, and then recrossing that fence. This is simply not necessary, nor would be a fast route. I strongly discourage this — even walking, I had great difficulty in finding a suitable place to either go over or under the fence. On the map, the fence is highlighted with a red line, along with an out-of-bounds symbol on the wrong (or East side) of the fence. (Technically this area is not out of bounds — the White and Yellow runners are on the East side of the fence. This OOB marking is simply for clarity.) On the ground, the fence will be marked with red or yellow tape to give warning.
All that being said, it's perfectly possible to use the West side of the fence as a handrail — just don't cross it!
The route from control 9 to 10 does cross the fence. In particular, there's a marked crossing point where there's a large gap under the fence. I'll be pulling up the wire, covering the barbs, and putting a mat on the ground, making it easy for people to dive, roll, or crawl under the fence at speed, large or small, young or old. Do not attempt to climb over the fence — the Park Wardens are particularly concerned about keeping the fence intact, since it forms a major barrier to the cattle.
Advanced Courses
The Red and Blue courses will cross electric fences that might or might not be turned on at the time of the event. We will post notices if fences are electrified. These fences can easily be identified as a single strand of wire about 2 feet off the ground. They are easy to pass over or under, although the possibility of a shock undoubtedly makes it a little harder. The shock from such a fence is annoying, but not dangerous.
All advanced courses will cross at least one standard 4-strand fence. These are typically easy to cross by passing under the lower strand. A couple of second's inspection will usually identify a good spot within a few meters. Please report any damage to fences.
Please refer to the comments on frog habitat in the Day-1 section and do not run directly in damp areas or watercourses if it can be avoided.
The Blue course goes through the only area on the map with any appreciable poison oak. In this area it takes the form of scattered bushes that are very easily avoided.
Day-2 Course Statistics
Course Distance Climb
  White      2.1 km     105 m
  Yellow     2.0 km     100 m
  Orange     4.3 km     260 m
  Brown      3.8 km     235 m
  Green      5.0 km     330 m
  Red        7.3 km     425 m
  Blue       9.5 km     560 m
Trail-O Training Course (Sunday)
Course Setter: Alex Finch
The Start will be at a picnic table in the registration area. You may start any time from 10:00 until 2:00. If I am set up earlier, I will start people earlier.
The map is printed at 1:5000. The course has four controls. The first control is visible from the Start. The other three controls are along a dirt road.
The course is free, and will not be officially scored. Answers for each control will be posted shortly after you finish each one.
I will give a short clinic on request at the Start.
More information about Trail-O and the Trail-O Training Series is available here.
Then be sure to travel south for the U.S. Trail-O Championship (http://www.vasquezo.org) at Vasquez Rocks on December 5th!
Figures
Figure 1: Reentrant Bottoms
Figure 2: Mapping Alternatives for Large Oak Trees


